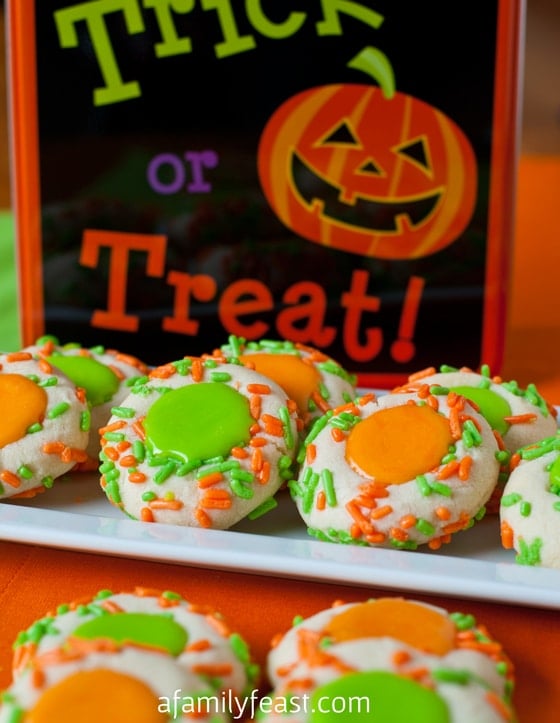
It’s hard to believe that Halloween is just a few weeks away, and for us, it’s the time of year when we start doing some serious holiday baking! My daughter loves to bake with me – in fact, I think she enjoys the baking ‘process’ more than eating the finished product! Emma will take one bite of a cookie and leaves the rest (she definitely didn’t inherit my sweet tooth!). These Halloween Thumbprint Cookies are a fun treat for any Halloween party – and, with just a little supervision, they are simple enough that your kids can help make them!
We rolled the sweet, buttery sugar cookie dough in Halloween-colored sprinkles, and then flattened it with a ‘thumbprint’ indentation before baking to hold a dollop of colorful icing in the center of each cookie. You can get as creative or as ‘ghoulish’ as you want with the color combinations for these Halloween thumbprint cookies – just mix a very small amount of gel food coloring into the icing to match whatever colored sprinkles you are using!
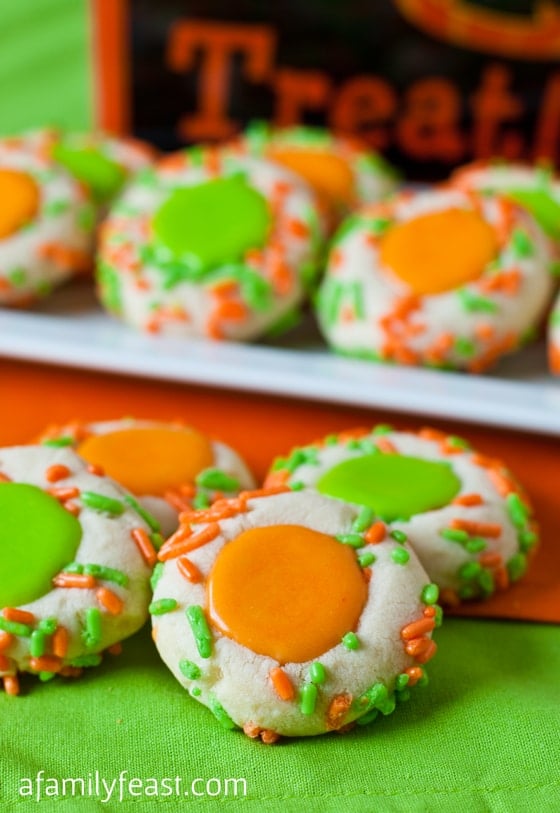
These Halloween thumbprint cookies are light and somewhat crumbly as you bite into them with a distinctive buttery flavor that reminds me of the classic Spritz cookie. One thing to note when baking these…the cookie dough is very tender and almost a dry texture, so when you are flattening the balls of dough and adding the thumbprint, just be sure to push down very gently so that the side of the ball of dough does not crack. (Although if they do crack, it’s not the end of the world – these Halloween thumbprint cookies will still taste delicious!)
Recipe adapted from Chelsea Bakes via The Brown Eyed Baker who was inspired to develop this cookie dough recipe based on the Chocolate Thumbprint Cookies sold at Giant Eagle grocery stores located in the Pittsburgh area.
PrintHalloween Thumbprint Cookies

- Prep Time: 20 mins
- Cook Time: 18 mins
- Total Time: 38 minutes
- Yield: 18 1x
- Category: cookies
- Method: baking
- Cuisine: American
Ingredients
For the Cookies
- Halloween-colored sprinkles
- 1 cup (2 sticks) unsalted butter, softened to room temperature
- 1 cup powdered sugar
- 2 teaspoons vanilla extract
- 1/2 teaspoon salt
- 2 1/2 cups all-purpose flour
For the Icing
- 3/4 cup powdered sugar
- 1 tablespoon corn syrup
- 1/8 teaspoon vanilla extract
- 1 teaspoon unsalted butter, melted
- 1 1/2 tablespoons milk (more to less to get consistency needed for spreading))
- Gel food coloring (to match the color of your sprinkles)
Instructions
To Prepare the Cookies
- Preheat the oven to 350 degrees. Line two cookie sheets with parchment paper. Pour the sprinkles into a small bowl and set aside.
- In the bowl of a stand mixer, cream together the butter, powdered sugar and vanilla for about 2-3 minutes, until light and fluffy. Add salt and mix until just combined. Gradually add the flour (about ½ cup at a time) mixing well after each addition until completely incorporated and the dough stays in a ball when pressed together.
- Using a measuring tablespoon, scoop the dough out into even portions. Using your hands, roll each portion into a round ball and then roll the dough in the sprinkles, pressing down as needed to make the sprinkles coat the cookie dough. Place the balls onto the prepared cookie sheet about 1½ inches apart. Using your thumb, gently press down on the top of each ball and make a small indentation, being careful not to crack the dough. (Do not completely flatten the dough – it will flatten a bit as it bakes.)
- Bake the cookies for 10 minutes. Remove from the oven and using a melon baller or other small round kitchen tool, gently press on each cookie to make a deeper indentation (but be careful again, not to press too hard and crack the sides). Bake for 7-8 minutes more until the cookies are set.
- Cool the cookies completely on a wire rack before frosting.
To Make the Icing
- In a small bowl, combine the powdered sugar, corn syrup, vanilla extract, melted butter and 1 tablespoon of milk. Stir to combine and add more milk as needed to get a smooth and spoonable, but not runny, consistency.
- If you want to make different colored icings for your cookies, divide the icing into small bowls – one for each color of icing you desire. Dip a toothpick into the gel food coloring and then stir into your icing, adding more as needed to make the color you want. With a clean toothpick, repeat the process for the other colors.
- Spoon a small amount of icing into the center of each cookie and allow to set completely before serving.
You may also like:
No-Bake Mini Pumpkin Cheesecakes
")
only got 2 dozen making I roll them too big not bad cookies
Thanks for your feedback Juanita.
So easy to make thank you
You’re welcome Carmen!
Delicious!!
Thanks Emily!
I made a Christmas version of these cookies and they turned out okay… I followed the recipe to a T and the dough was way too dry. It does mention that the dough is dry and crumbly in the recipe multiple times, although it was way too dry to even work with in my opinion. The sprinkles don’t stick and it cracked way too much. For the second batch I added a little bit of water into the dough and it made a much better dough that was sticky enough to hold its shape and the sprinkles stuck to. The cookies came out hard and crunchy so if you like that these are perfect for you!
Thanks for your feedback Andrea – we’re sorry you were disappointed in the recipe. The cookies should come out something like a shortbread cookie – so not cake-like, but certainly not hard and crunchy. I’m glad you were able to get the second batch more to your liking.
These are absolutely adorable! A must try this weekend for the teens! Thanks so much for sharing this recipe.
Thanks Heather!
You can never go wrong with thumbprint cookies they rock! and yours look so cute!!!
Thanks Maggie!
I love the bright colors!
Thanks Dina!
These are adorable! Halloween kicks off our Holiday baking bonanza season as well! I feel like it is non stop until New Years! We recently made some fun Alien Eyeball Cookies that will popping up on the blog soon! The kids had a lot of fun with those!
Thanks Cara! Can’t wait to see those eyeball cookies!!
These would be so cute for my son’s class!
I’m planning the exact same for my daughter’s class Kathy! Hope you enjoy them as much as we did! Thanks for stopping by today.
Martha love these colorful thumbprint cookies! The recipe easy to follow and I know that my grandkids will love them. You have a winner here! Can’t wait to make them.
Thanks so much Ronda!